White Chocolate Dipped Red Velvet Cookies | Thick, Soft & Bakery-Style
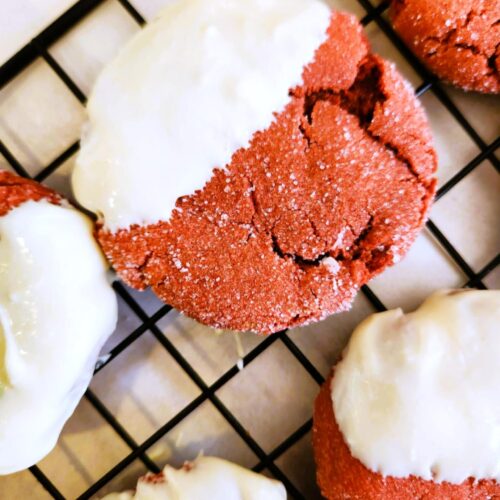
These thick, chewy red cookies are rolled in sugar and half-dipped in white chocolate for a bakery-style red velvet treat. Perfect for Valentine’s Day, Christmas, or any sweet craving!
Ingredients
For The Red Cookies
- ½ Cup butter softened
- ⅔ Cup granulated sugar
- ⅓ Cup brown sugar
- 1 large egg
- 2 Teaspoons vanilla extract
- 1 Teaspoon red food coloring
- ¼ Teaspoon espresso powder optional but highly recommended
- 1 Teaspoon white vinegar or buttermilk
- 2 Cups + 2 Tablespoons all-purpose flour
- 1½ Tablespoons cocoa powder
- 1 Teaspoon baking soda
- ½ Teaspoon cornstarch
- ½ Teaspoon salt
For The Rolling
- ¼ Cup granulated sugar
For The Dipping
- 1 Cup white chocolate chips
Instructions
- Preheat the oven to 350°F and line two baking sheets with parchment paper. Use two pans: while one batch cools, the next one bakes - true bakery style red velvet cookies efficiency.
- In a large bowl, cream together butter and sugars until light and fluffy.
- Add the egg, vanilla, red food coloring, espresso powder, and vinegar (or buttermilk). Mix until smooth. The espresso powder deepens the cocoa flavor in these chewy red velvet cookies without tasting like coffee.
- In a separate bowl, whisk together the flour, and sift the cocoa powder, baking soda, cornstarch, and salt. Sifting the cocoa helps keep these cookies light and prevents any clumps of bitter cocoa in your red cookies. Gradually mix into the wet ingredients just until combined. Do not overmix.
- Scoop dough into large balls - bigger than you think. That’s how you get those thick soft red velvet cookies.
- Roll each dough ball in sugar, then move to your baking pan.
- Bake for 9 minutes. The centers will look slightly underdone - perfect for soft cookies. As soon as they come out of the oven, gently flatten each cookie with the back of a spoon or your palm for that signature bakery-style thick yet even look. Let cool on the pan for 10 minutes before transferring.
- Melt white chocolate in 20-second intervals, stirring between each round until smooth. Stop heating when almost melted - residual heat will finish it. Warning: Glass bowls hold heat and can push chocolate into seizing territory. Use a different type of bowl if you can.. if not, it's ok.. just take it slow.
- Dip half of each cooled cookie into the melted white chocolate. Let set completely on parchment or a wire cooling rack.